Setting Up Git
Last updated on 2023-08-15 | Edit this page
Overview
Questions
- How do I get set up to use Git?
Objectives
- Configure
gitthe first time it is used on a computer. - Understand the meaning of the
--globalconfiguration flag.
When we use Git on a new computer for the first time, we need to configure a few things. Below are a few examples of configurations we will set as we get started with Git:
- our name and email address,
- what our preferred text editor is,
- and that we want to use these settings globally (i.e. for every project).
On a command line, Git commands are written as
git verb options, where verb is what we
actually want to do and options is additional optional
information which may be needed for the verb. So here is
how Sarah sets up her new laptop:
BASH
$ git config --global user.name "Sarah Robertson"
$ git config --global user.email "s.robertson@researcher.co"
Please use your own name and email address instead of Sarah’s. This user name and email will be associated with your subsequent Git activity, which means that any changes pushed to GitHub, BitBucket, GitLab or another Git host server after this lesson will include this information.
For this lesson, we will be interacting with GitHub and so the email address used should be the same as the one used when setting up your GitHub account. If you are concerned about privacy, please review GitHub’s instructions for keeping your email address private.
Keeping your email private
If you elect to use a private email address with GitHub, then use
that same email address for the user.email value,
e.g. username@users.noreply.github.com replacing
username with your GitHub one.
Line Endings
As with other keys, when you hit Enter or ↵ or on Macs, Return on your keyboard, your computer encodes this input as a character. Different operating systems use different character(s) to represent the end of a line. (You may also hear these referred to as newlines or line breaks.) Because Git uses these characters to compare files, it may cause unexpected issues when editing a file on different machines. Though it is beyond the scope of this lesson, you can read more about this issue in the Pro Git book.
You can change the way Git recognizes and encodes line endings using
the core.autocrlf command to git config. The
following settings are recommended:
On macOS and Linux:
And on Windows:
Sarah also has to set her favorite text editor, following this table:
| Editor | Configuration command |
|---|---|
| Atom | $ git config --global core.editor "atom --wait" |
| nano | $ git config --global core.editor "nano -w" |
| BBEdit (Mac, with command line tools) | $ git config --global core.editor "bbedit -w" |
| Sublime Text (Mac) | $ git config --global core.editor "/Applications/Sublime\ Text.app/Contents/SharedSupport/bin/subl -n -w" |
| Sublime Text (Win, 32-bit install) | $ git config --global core.editor "'c:/program files (x86)/sublime text 3/sublime_text.exe' -w" |
| Sublime Text (Win, 64-bit install) | $ git config --global core.editor "'c:/program files/sublime text 3/sublime_text.exe' -w" |
| Notepad (Win) | $ git config --global core.editor "c:/Windows/System32/notepad.exe" |
| Notepad++ (Win, 32-bit install) | $ git config --global core.editor "'c:/program files (x86)/Notepad++/notepad++.exe' -multiInst -notabbar -nosession -noPlugin" |
| Notepad++ (Win, 64-bit install) | $ git config --global core.editor "'c:/program files/Notepad++/notepad++.exe' -multiInst -notabbar -nosession -noPlugin" |
| Kate (Linux) | $ git config --global core.editor "kate" |
| Gedit (Linux) | $ git config --global core.editor "gedit --wait --new-window" |
| Scratch (Linux) | $ git config --global core.editor "scratch-text-editor" |
| Emacs | $ git config --global core.editor "emacs" |
| Vim | $ git config --global core.editor "vim" |
| VS Code | $ git config --global core.editor "code --wait" |
It is possible to reconfigure the text editor for Git whenever you want to change it.
Exiting Vim
Note that Vim is the default editor for many programs. If you haven’t
used Vim before and wish to exit a session without saving your changes,
press Esc then type :q! and hit Enter
or ↵ or on Macs, Return. If you want to save your
changes and quit, press Esc then type :wq and
hit Enter or ↵ or on Macs, Return.
Git (2.28+) allows configuration of the name of the branch created
when you initialize any new repository. Sarah decides to use that
feature to set it to main so it matches the cloud service
she will eventually use.
Default Git branch naming
Source file changes are associated with a “branch.” For new learners
in this lesson, it’s enough to know that branches exist, and this lesson
uses one branch.
By default, Git will create a branch called master when you
create a new repository with git init (as explained in the
next Episode). This term evokes the racist practice of human slavery and
the software development
community has moved to adopt more inclusive language.
In 2020, most Git code hosting services transitioned to using
main as the default branch. As an example, any new
repository that is opened in GitHub and GitLab default to
main. However, Git has not yet made the same change. As a
result, local repositories must be manually configured to have the same
main branch name as most cloud services.
For versions of Git prior to 2.28, the change can be made on an
individual repository level. The command for this is in the next
episode. Note that if this value is unset in your local Git
configuration, the init.defaultBranch value defaults to
master.
The five commands we just ran above only need to be run once: the
flag --global tells Git to use the settings for every
project, in your user account, on this computer.
Let’s review those settings and test our core.editor
right away:
Let’s close the file without making any additional changes. Remember, since typos in the config file will cause issues, it’s safer to view the configuration with:
And if necessary, change your configuration using the same commands to choose another editor or update your email address. This can be done as many times as you want.
Proxy
In some networks you need to use a proxy. If this is the case, you may also need to tell Git about the proxy:
To disable the proxy, use
SSH Background and Setup
Before Sarah can connect to a remote repository, she needs to set up a way for her computer to authenticate with GitHub so it knows it’s her trying to connect to her remote repository.
We are going to set up the method that is commonly used by many different services to authenticate access on the command line. This method is called Secure Shell Protocol (SSH). SSH is a cryptographic network protocol that allows secure communication between computers using an otherwise insecure network.
The SSH protocol uses what is called a key pair. It requires two key files that work together to help you authenticate with cloud services. To set it up, you upload the public key file to a cloud service like GitHub.
You can think of the public key as a padlock, and only you have the key (the private key) to open it. You use the public key where you want a secure method of communication, such as your GitHub account. You give this padlock, or public key, to GitHub and say “lock the communications to my account with this so that only computers that have my private key can unlock communications and send git commands as my GitHub account.” If you’d like to learn more about SSH, a supplemental episode in this lesson discusses SSH and key pairs in more depth.
Never share or upload the private key file. Someone who has access to the private key may be able to authenticate as you.
We will setup the computer with SSH keys and add the public key to your GitHub account. This process needs to be done once for each device.
Check for existing key pairs
The first thing we are going to do is check if this has already been done on the computer you’re on. Because generally speaking, this setup only needs to happen once and then you can forget about it.
We will run the list command to check what key pairs already exist on
your computer. SSH key pair files are usually stored in
~/.ssh.
Your output is going to look a little different depending on whether or not SSH has ever been set up on the computer you are using.
Sarah has not set up SSH on her computer, so her output is
OUTPUT
ls: cannot access '/c/Users/Sarah/.ssh': No such file or directoryIf SSH has been set up on the computer you’re using, the public and
private key pairs will be listed. The file names are either
id_ed25519/id_ed25519.pub or
id_rsa/id_rsa.pub depending on how the key
pairs were set up. Since they don’t exist on Sarah’s computer, she uses
this command to create them.
Create an SSH key pair
To create an SSH key pair Sarah uses this command, where the
-t option specifies which type of algorithm to use and
-C attaches a comment to the key. Replace Sarah’s email
address with yours.
If you are using a legacy system that doesn’t support the Ed25519
algorithm, use:
$ ssh-keygen -t rsa -b 4096 -C "srobertson@researcher.co"
OUTPUT
Generating public/private ed25519 key pair.
Enter file in which to save the key (/c/Users/Sarah/.ssh/id_ed25519):
We want to use the default file, so just press Enter.
OUTPUT
Created directory '/c/Users/Sarah/.ssh'.
Enter passphrase (empty for no passphrase):
Now, it is prompting Sarah for a passphrase. Since she is using her kitchen’s laptop that other people sometimes have access to, she wants to create a passphrase. Be sure to use something memorable or save your passphrase somewhere, as there is no “reset my password” option.
OUTPUT
Enter same passphrase again:After entering the same passphrase a second time, we receive the confirmation
OUTPUT
Your identification has been saved in /c/Users/Sarah/.ssh/id_ed25519
Your public key has been saved in /c/Users/Sarah/.ssh/id_ed25519.pub
The key fingerprint is:
SHA256:SMSPIStNyA00KPxuYu94KpZgRAYjgt9g4BA4kFy3g1o srobertson@researcher.co
The key's randomart image is:
+--[ED25519 256]--+
|^B== o.          |
|%*=.*.+          |
|+=.E =.+         |
| .=.+.o..        |
|....  . S        |
|.+ o             |
|+ =              |
|.o.o             |
|oo+.             |
+----[SHA256]-----+
The “identification” is actually the private key. You should never share it. The public key is appropriately named. The “key fingerprint” is a shorter version of a public key.
Now that we have generated the SSH keys, we will find the SSH files when we check.
OUTPUT
drwxr-xr-x 1 Sarah   197121   0 Jul 16 14:48 ./
drwxr-xr-x 1 Sarah   197121   0 Jul 16 14:48 ../
-rw-r--r-- 1 Sarah   197121 419 Jul 16 14:48 id_ed25519
-rw-r--r-- 1 Sarah   197121 106 Jul 16 14:48 id_ed25519.pub
Copy the public key to GitHub
Now we have a SSH key pair, we can set up the public key on GitHub so it knows how to authenticate us.
First, we need to copy the public key. Be sure to include the
.pub at the end, otherwise you’re looking at the private
key.
OUTPUT
ssh-ed25519 AAAAC3NzaC1lZDI1NTE5AAAAIDmRA3d51X0uu9wXek559gfn6UFNF69yZjChyBIU2qKI srobertson@researcher.coSelect the output and copy it.
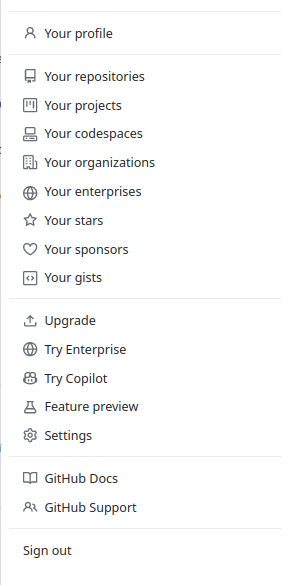
Now, going to GitHub.com, click on your profile icon in the top right corner to get the drop-down menu, and click “Settings”.
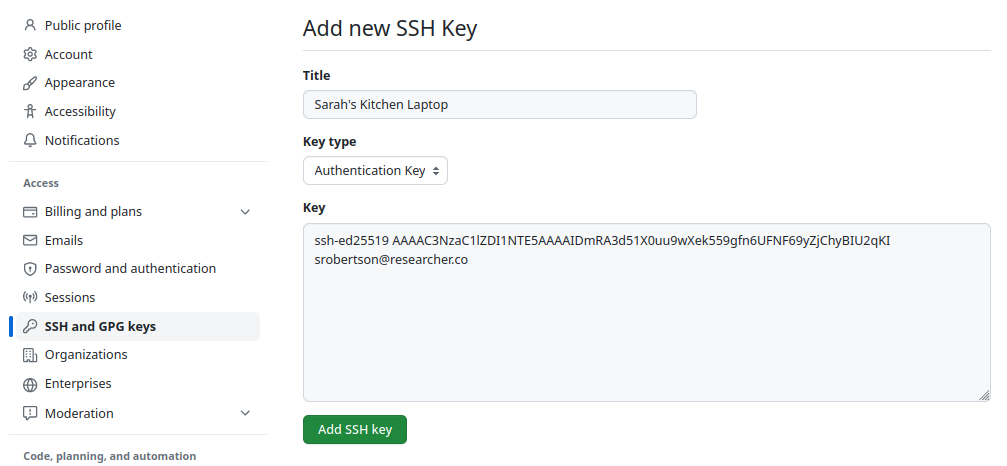
On the settings page, click “SSH and GPG keys,” under the “Access” heading on the left.
Click the “New SSH key” button on the right side. Add a title to describe which device the key pair files are on. Sarah uses the title “Sarah’s Kitchen Laptop” so she can remember. Paste your SSH key into the field, and click the “Add SSH key” to complete the setup.
Now that we’ve set that up, let’s check our authentication from the command line.
OUTPUT
Hi Sarah! You've successfully authenticated, but GitHub does not provide shell access.Good! This output confirms that the SSH key works as intended. We are now ready to push our work to the remote repository.
Keeping your keys secure
You shouldn’t really forget about your SSH keys, since they keep your account secure. It’s good practice to audit your secure shell keys every so often. Especially if you are using multiple computers to access your account.
Git Help and Manual
Always remember that if you forget the subcommands or options of a
git command, you can access the relevant list of options
typing git <command> -h or access the corresponding
Git manual by typing git <command> --help, e.g.:
While viewing the manual, remember the : is a prompt
waiting for commands and you can press Q to exit the
manual.
More generally, you can get the list of available git
commands and further resources of the Git manual typing:
Key Points
- Use
git configwith the--globaloption to configure a user name, email address, editor, and other preferences once per machine.