How to Use Nectar Performance Volume
Introduction
Nectar Auckland node now provides a new type of block storage called “Performance Volume”. Performance Volumes are backed by high-performance storage hardware (NVME SSDs) and offer improved performance compared to standard volumes. This type of volume is designed for workloads that require high IOPS and low latency, such as:
- SQL and NoSQL databases
- Big data analytics
- High-performance computing applications
- Data-intensive applications
The performance volume type is not available by default because of the additional costs and limited capacity. If your research workload requires high-performance storage, you can request a Performance Volume quota and use it in your Nectar instances. This article will guide you through the process of requesting a Performance Volume quota and converting an existing volume to a Performance Volume.
Request Performance Volume for Your Allocation
If your allocation does not have a Performance Volume quota, you can request one by following these steps:
- Amend your allocation by following This Tutorial
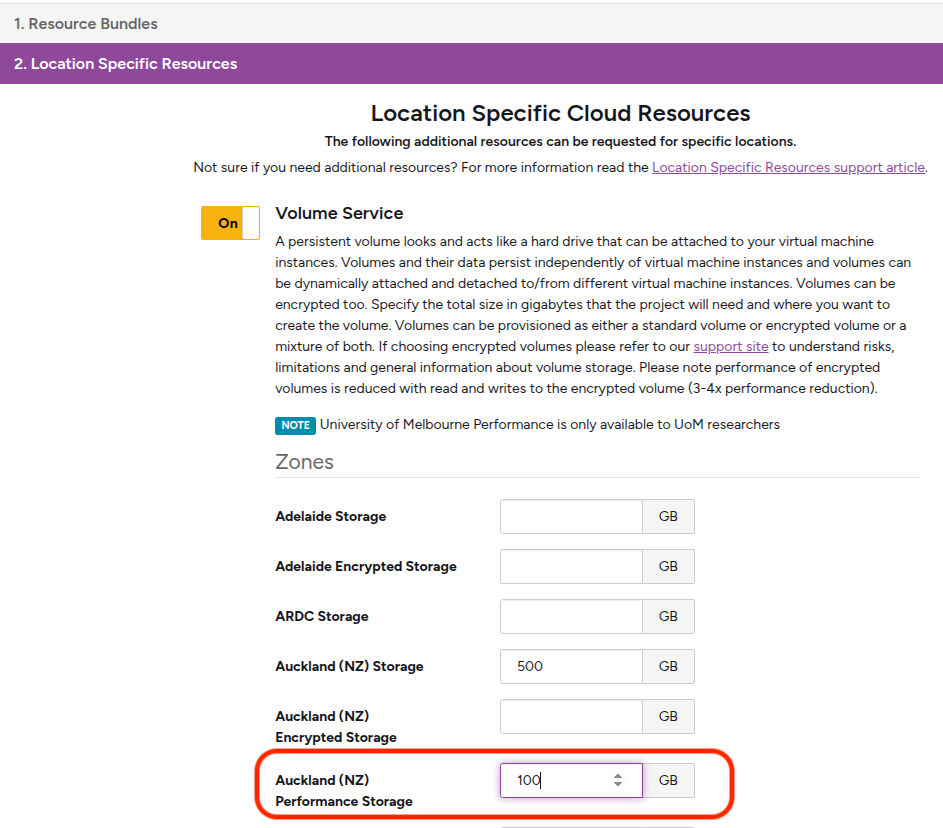
- In Step 2 “Cloud Resources”, scroll down to “2. Location Specifics Resources” and enter the amount of quota you need for “Auckland (NZ) performance Storage” in GB. For example, if you need 100GB of Performance Volume, enter “100” in the input box.
- Complete the rest of the form and submit your amendment request. The Nectar Ops team will review your request and grant the Performance Volume quota if approved.
Once you have the Performance Volume quota, you can create a new Performance Volume or convert an existing standard volume to a Performance Volume.
Create a New Performance Volume
When creating a new volume in the Nectar dashboard, you can select “Performance” as the volume type. This will create a new volume that is backed by high-performance storage hardware.
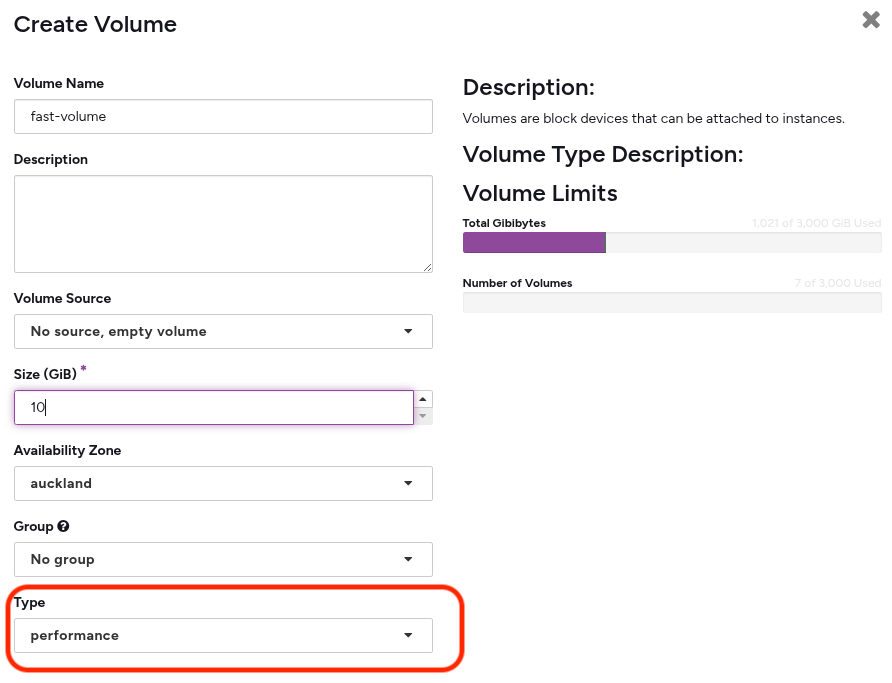
If you can’t see the “Performance” option, it means your allocation does not have the Performance Volume quota. Please follow the steps in the previous section to request the quota.
Convert Existing Volume to Performance Volume
Warning: Please backup your important data before converting an existing volume to a Performance Volume. Although the conversion process is designed to be safe, there is always a risk of data loss when performing operations on storage volumes. It’s better to be safe than sorry.
If you have an existing standard volume that you want to convert to a Performance Volume, you can do so using the command line interface (CLI) and the openstack command. If you are not familiar with the CLI, you can raise a ticket for help. They can assist you with converting your existing volume to a Performance Volume.
If you want to try it yourself, follow these steps:
- If you haven’t already, install the OpenStack CLI on your local machine. You can follow the instructions in the OpenStack CLI documentation to do this.
- Unmount the existing volume from your Nectar instance if it’s currently attached.
- Detach the existing volume from your Nectar instance using the OpenStack CLI. You can use the following command to do this:
openstack server remove volume <server_id> <volume_id>Replace
<server_id>with the ID of your Nectar instance and<volume_id>with the ID of the existing volume you want to convert. - Run this command to convert the existing volume to a Performance Volume:
openstack volume set --type 690c74a9-b31a-4a3d-8e6c-4e7289c8c06e --migration-policy on-demand <volume_id>Replace
<volume_id>with the ID of the existing volume you want to convert. - Check the status of the volume conversion process using the dashboard or the following command:
openstack volume show <volume_id>The volume status will change to “available” once the conversion is complete. The conversion process may take some time, depending on the size of the volume and the amount of data stored on it. Please be patient and do not interrupt the process.
- Attach the converted Performance Volume back to your Nectar instance using the OpenStack CLI:
openstack server add volume <server_id> <volume_id>Replace
<server_id>with the ID of your Nectar instance and<volume_id>with the ID of the converted Performance Volume.