Summary and Setup
Kai and Sarah are aspiring cookbook authors. They are each writing a cookbook, and want to collaborate on writing one of the recipes, but they have run into problems doing this in the past. If they take turns, each one will spend a lot of time waiting for the other to finish, but if they work on their own copies and email changes back and forth things will be lost, overwritten, or duplicated.
A colleague suggests using version control to manage their work. Version control is better than mailing files back and forth:
Nothing that is committed to version control is ever lost, unless you work really, really hard at it. Since all old versions of files are saved, it’s always possible to go back in time to see exactly who wrote what on a particular day, or what version of a program was used to generate a particular set of results.
As we have this record of who made what changes when, we know who to ask if we have questions later on, and, if needed, revert to a previous version, much like the “undo” feature in an editor.
When several people collaborate in the same project, it’s possible to accidentally overlook or overwrite someone’s changes. The version control system automatically notifies users whenever there’s a conflict between one person’s work and another’s.
Teams are not the only ones to benefit from version control: lone researchers can benefit immensely. Keeping a record of what was changed, when, and why is extremely useful for all researchers if they ever need to come back to the project later on (e.g., a year later, when memory has faded).
Version control is the lab notebook of the digital world: it’s what professionals use to keep track of what they’ve done and to collaborate with other people. Every large software development project relies on it, and most programmers use it for their small jobs as well. And it isn’t just for software: books, papers, small data sets, and anything that changes over time or needs to be shared can and should be stored in a version control system.
Prerequisites
In this lesson we use Git from the Unix Shell. Some previous experience with the shell is expected, but isn’t mandatory.
Installing Git
This workshop relies on an installation of Git and a GitHub account. Follow these instructions for installing Git for various operating systems.
Windows
Git installation on Windows
- Download the Git for Windows installer.
- Run the installer and follow the steps below:
- Click on “Next” four times (two times if you’ve previously installed Git). You don’t need to change anything in the Information, location, components, and start menu screens.
- From the dropdown menu, “Choosing the default editor used by Git”, select “Use the Nano editor by default” (NOTE: you will need to scroll up to find it) and click on “Next”.
- On the page that says “Adjusting the name of the initial branch in new repositories”, ensure that “Let Git decide” is selected. This will ensure the highest level of compatibility for our lessons.
- Ensure that “Git from the command line and also from 3rd-party software” is selected and click on “Next”. (If you don’t do this Git Bash will not work properly, requiring you to remove the Git Bash installation, re-run the installer and to select the “Git from the command line and also from 3rd-party software” option).
- Select “Use bundled OpenSSH”.
- Ensure that “Use the native Windows Secure Channel Library” is selected and click on “Next”.
- Ensure that “Checkout Windows-style, commit Unix-style line endings” is selected and click on “Next”.
- Ensure that “Use Windows’ default console window” is selected and click on “Next”.
- Ensure that “Default (fast-forward or merge) is selected and click”Next”.
- Ensure that “Git Credential Manager” is selected and click on “Next”.
- Ensure that “Enable file system caching” is selected and click on “Next”.
- Click on “Install” (Do Not check any boxes on this screen).
- Click on “Finish” or “Next”.
- If your “HOME” environment variable is not set (or you don’t know
what this is):
- Open command prompt (Open Start Menu then type cmd and press Enter).
- Type the following line into the command prompt window exactly as shown:
- Press Enter, you should see:
SUCCESS: Specified value was saved - Quit command prompt by typing
exitthen pressing Enter

MacOS
Git installation on MacOS
- Your version of MacOS may have come with Git pre-installed. Open the Terminal app, then type the command below and press Enter:
- if Git is installed you should expect to see an output like:
git version 2.45.1- if Git is not installed you will be prompted to install it:
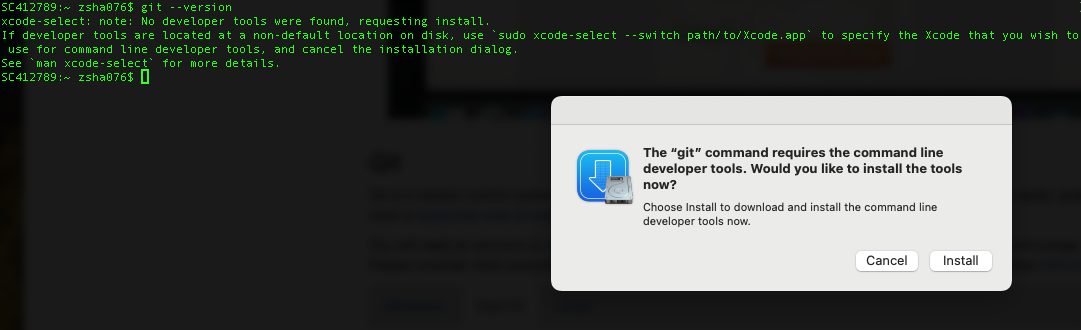
click “Install” and wait a few minutes and you should have Git installed.
You can verify this by running
git versionagain.
Linux
Git installation on Linux
- Your Linux Distribution may have come with Git pre-installed, you can check with the command:
- if Git is installed you should expect to see an output like:
git version 2.45.1- If Git is not already available on your machine you can install it via your distro’s package manager.
For example on Debian/Ubuntu run:
or for Fedora run:
or for Manjaro/Arch run:
Preparing Your Working Directory
We’ll do our work in the Documents folder so make sure
you change your working directory to it with:
Creating a GitHub account
You will also need an account at github.com Basic GitHub accounts are free. This workshop requires you to create a GitHub account if you don’t have one already.
To Create a GitHub account go to github.com fill the email address you wish to use and select Sign up for GitHub then follow the prompts on screen.
We encourage you to use a strong password and please consider what personal information you’d like to reveal on your GitHub account. For example, you may want to review these instructions for keeping your email address private provided at GitHub.